 September 07, 2018 • read
Guest Post: Data Automation With SkyBuild
|
Abe Loveless Director of Technology, East St. Louis 189 |
How would you like to be able to move your student data from one system to another, and set up that process to run automatically? Sound like a dream? Well, I have good news: it’s possible. It can save you a ton of time, and it’s why I’m excited about student data automation.
Having spent 20 years working around and in K–12 school districts, I am quite familiar with the annual setup and rostering of a myriad of systems at the start of the school year. And, once setup is complete, there's the periodic maintenance of those systems. Depending on your environment, you may process updates once a month, once a week, or even daily. (A practical example could be the nightly rostering of third-party software programs like food service, library, or an online assessment system.) Think of the time savings that could be had if these processes were run automatically!
Most modern software applications provide methods for importing data in some respect. Usually, a comma separated (.csv) file can be provided via some interface. Then, the application can read that file and perform whatever updates may be necessary. Sometimes, this file is uploaded via Secure FTP to the vendor, or, if locally hosted, it can be copied to a network share on your network. If you aren’t sure what you can do, your best bet is to call your vendor’s support line and ask if there is a way to import your student data.
Once you have determined whether a particular vendor supports the importing of data and you know how the feature can be implemented, you need to figure out how to get the required data out of Skyward! Usually, the vendor will provide you with a .csv template showing required and optional fields. Typical fields include student ID, first name, last name, grade, and date of birth. Depending on the application, schedule data may also be requested.
This is where SkyBuild comes into play.
By going to Student Management > Administration > SkyBuild > Exports > Export File Builder (WS\AD\SB\EX\EF\EF), you can create an interface for each system that you are working with. Within the interface, you can create multiple files.

Some vendors will request multiple files. This feature makes it easy to keep all those files together. In the image above, you can see the Export Location, which is the folder that will contain the exported files.
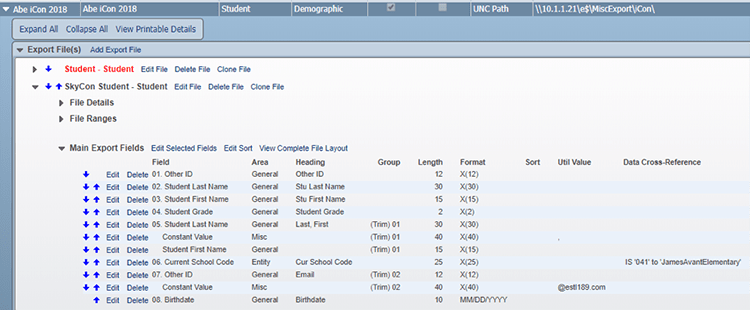
With the Export File Builder, you not only can pull a lot of data from Skyward, but also can manipulate and format that data as it is being exported. You can convert codes (KD to K) or insert static text (maybe you want to upload a default password for all users), and append multiple fields together. In the image below, you can see that I made my own group for Last, First Name by concatenating these three fields: Last, Comma (and a space), and First. I also did a data cross-reference to change Entity “041” to “JamesAvantElementary,” the campus name. Remember, these are only changes in the output, and are not actually changing anything in the Skyward data.

Once you have your file built the way you want it, click the Export button in the upper left to begin the export process.
You might say, “That’s great, but how do I automate it?” Here is a three-part answer:
1. After clicking the Export button above, you will see the job processing in your Skyward Print Queue. Highlight the job and click Tasks on the right. From here, you can create a Scheduled Task and set the parameters for how often it should run.

2. Create a Scheduled Task in Windows Task Manager to move these files where they need to go. The files may need to be moved to another server, uploaded via SFTP, or have some other processing done to them (like removing duplicate rows or emailing files to other users). If you used batch files in the MS-DOS days to automate functions, you’ll be happy to know that this method still works. Simply enter your commands like copy, move, or any program name—one command on each line. In the example below, the contents of the batch file are used to move files from one location to another, run a Visual Basic script to remove duplicate line entries, zip a collection of files into a single zip file, then call another batch file that will upload the collection to the vendor.

3. Now that the files have been moved and/or sent where they need to go, you may need to schedule the Import task in your other system. You’ll need to set this up with the assistance of whatever product vendor you are working with, but only if they do not have something set up to run automatically. For instance, some vendors will scan a folder each night looking for new files. If a file is found, it will process updates; if no file is found, it will skip the action. In this case, all you would need to do is make sure your new files get into that folder before the job on the vendor’s server runs.
And with that, your data automation process is complete! Setting up processes like these can save you a considerable amount of time, and who couldn’t benefit from that?
A final thought on SSO: In recent years, several vendors have made great strides in providing integration services to connect your Skyward data to other systems for the purpose of providing single sign-on functionality and rostering services. Examples include Clever and ClassLink. As always, there are pros and cons to each, but you may want to check into these types of products if they fit your budget.
About the author: Abe Loveless is the Director of Technology at the East St. Louis School District 189 in East St. Louis, Illinois. He has been a member of the Illinois Skyward User Group Steering Committee for several years, and has presented a session on the above topic at the last four annual IL Skyward User Group Conferences and at the last two annual Skyward iCon conferences. Check out his session if you can!
Follow-Up Resource: Data Tracking Beyond Skyward
Ever wanted to keep track of data that doesn’t yet have a predefined field in Skyward? We can help with that. Check out Data Tracking Beyond Skyward.Thinking about edtech for your district? We'd love to help. Visit skyward.com/get-started to learn more.
|
Abe Loveless Director of Technology, East St. Louis 189 |

 Get started


